How to Repair a Computer Fan: Step-by-Step Guide for Beginners
- Understanding the Computer Fan
- Signs That Your Computer Fan Needs Repair
- Tools Required for Repairing Your Computer Fan
- Step-by-Step Guide to Repair Your Computer Fan
- When to Replace Your Computer Fan
- Common Mistakes to Avoid During Fan Repair
When I first faced a loud, spinning computer fan, I wasn’t sure what was causing the issue. After some research and a bit of trial and error, I learned that the computer fan is one of the most crucial components of your computer’s cooling system. A malfunctioning or dirty fan can lead to overheating, which can severely damage your hardware. Understanding how the fan works and why it’s essential to maintain it is key to troubleshooting and performing repairs.
In this guide, I will walk you through how to repair a computer fan, explain the signs that your fan might need attention, and show you when it’s time to replace the fan entirely. Whether you’re a beginner or have some experience working with computers, this article will provide helpful tips and a clear step-by-step process to address common fan issues.

Best Buy
4210 Centerplace Dr, Greeley, CO 80634, USA
Signs That Your Computer Fan Needs Repair
Before diving into the repair process, it’s important to know the signs that your computer fan may need attention. Based on my own experience, here are a few common indicators that can signal problems with your fan:

Action Computers Inc. -- Denver Location
2890 S Colorado Blvd F, Denver, CO 80222, USA
1. Loud or Unusual Noises
If your computer fan starts making loud or unusual noises, it’s often a sign that the fan blades are obstructed, damaged, or worn out. I’ve found that this is one of the first signs that something is wrong with the fan. A healthy fan should operate quietly and efficiently, so any strange sounds could indicate a problem that needs attention.
2. Overheating
One of the primary functions of a computer fan is to keep the internal components cool. If your fan isn’t working properly, you may notice your computer becoming unusually hot. Overheating can lead to performance issues, crashes, and even permanent hardware damage. If your computer is hot to the touch or shutting down due to heat, it could be time to inspect or repair the fan.
3. System Slowness
Another symptom of a malfunctioning fan is noticeable system slowness. When the fan fails to cool the system, the processor may throttle its speed to prevent overheating, which can cause your computer to run much slower than usual. I’ve seen this happen with my own devices, and it’s often a clear sign that the fan or cooling system needs fixing.
Tools Required for Repairing Your Computer Fan
Before you start repairing the fan, it’s important to gather the right tools. While the process is relatively simple, having the right equipment makes it easier and safer. Here’s a list of tools you will likely need:
1. Screwdriver Set
A precision screwdriver set will allow you to remove screws from the case and access the fan. Make sure to use the right size screwdriver for your particular computer model. I’ve found that having a set with different sizes is essential for different types of screws.
2. Compressed Air
Compressed air is a great tool to clean out dust and debris from the fan blades and internal components. Dust buildup is one of the most common causes of fan malfunction, so I always recommend using compressed air to clean the fan before attempting any repairs.
3. Thermal Paste (if needed)
If you’re replacing the fan and need to remove the heatsink or other components, you may need thermal paste to reapply between the processor and heatsink for optimal heat transfer. I’ve found that having thermal paste on hand is a useful step when removing or replacing the fan assembly.
Step-by-Step Guide to Repair Your Computer Fan
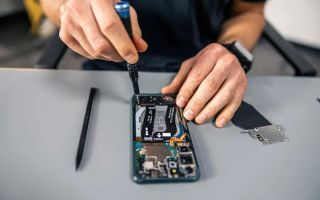
Now that you have the necessary tools, it’s time to get started with the repair. Here’s a step-by-step guide to help you get your computer fan running smoothly again:
1. Power Off and Disconnect
Before working on any internal components, make sure to power off your computer and disconnect it from the power source. It’s also a good idea to remove the battery if you’re working on a laptop. Safety should always be your first priority. I can’t stress this enough—turn off everything to avoid electric shocks or accidental damage to your components.
2. Open the Computer Case
Use the screwdriver to open the computer case. If you’re working with a desktop, you may need to remove screws on the back or side panels. For laptops, you may need to remove a few screws on the bottom or sides to access the fan. Take your time and keep track of the screws as you go.
3. Inspect and Clean the Fan
Once you have access to the fan, use compressed air to remove any dust or dirt that has accumulated on the fan blades and surrounding areas. Dust buildup can significantly hinder fan performance. I’ve found that regularly cleaning the fan can prevent overheating and other issues from arising.
4. Check for Physical Damage
Inspect the fan blades for any signs of damage. If the blades are cracked or broken, or if the fan seems to be wobbling, it’s time to replace it. You can purchase a replacement fan that matches your computer’s specifications. I’ve personally replaced several fans over the years, and it’s a simple process that typically doesn’t require advanced technical skills.
5. Reassemble the Computer
Once the fan is cleaned and inspected, or a replacement is in place, carefully reassemble the computer. Make sure all screws are tightened and components are securely in place. Power the system back on and ensure that the fan is operating correctly. You should be able to feel a smooth airflow and hear a quiet fan running.
When to Replace Your Computer Fan
Sometimes, repairing your computer fan isn’t enough, and it’s best to replace it entirely. If your fan is making loud, irregular noises, or if cleaning and repairing don’t seem to help with cooling, it may be time for a replacement. Additionally, if the fan is too old or has visible physical damage, replacement is the best option to ensure your computer stays cool and performs optimally.
Common Mistakes to Avoid During Fan Repair
While repairing your computer fan is a relatively straightforward task, there are a few common mistakes to watch out for:
1. Over-tightening Screws
It’s easy to over-tighten screws when putting your computer back together. I’ve found that this can cause damage to the components or the casing. Always tighten screws gently, and don’t force them if they don’t go in smoothly.
2. Using the Wrong Fan Replacement
Make sure to purchase a fan that matches your computer’s specifications. Using the wrong fan can cause airflow issues, overheating, or even permanent damage to your system. I always double-check the part numbers and specifications before buying a replacement fan.
If you’re not comfortable performing the repair yourself, or if you encounter a problem that you can’t fix, don't hesitate to reach out to a professional. A skilled technician at [Computer Repair] can help you get your computer back to running smoothly in no time!