- why-upgrading-ram-matters-for-performance
- check-compatibility-before-you-buy
- step-by-step-how-to-upgrade-ram-in-a-desktop
- step-by-step-how-to-upgrade-ram-in-a-laptop
- real-story-my-slow-laptop-now-runs-like-new
- when-to-get-help-from-experts
1. Why Upgrading RAM Matters for Performance
Learning how to upgrade RAM in your desktop or laptop is one of the most rewarding and cost-effective ways to boost performance. Whether you’re dealing with sluggish multitasking, browser lag, or crashes during gaming or video editing, more RAM usually translates to smoother computing.
Think of RAM as your system’s short-term memory. The more you have, the more your device can handle simultaneously—whether it's browser tabs, software, or background processes. If your computer freezes when you're running a few programs at once, upgrading your RAM could be the solution.

Action Computers Inc. -- Denver Location
2890 S Colorado Blvd F, Denver, CO 80222, USA
2. Check Compatibility Before You Buy
2.1 Identify Your Current Setup
Before shopping, check how much RAM your system currently has and how much it can support. On Windows, press Ctrl + Shift + Esc to open Task Manager, then click the “Performance” tab. On macOS, go to About This Mac > Memory.
2.2 Match the Right Type and Speed
RAM modules vary by type (DDR3, DDR4, DDR5), speed (measured in MHz), and form factor (DIMM for desktops, SO-DIMM for laptops). Mixing incompatible RAM types can cause boot errors or underperformance. Use trusted tools like Crucial’s System Scanner to identify the exact specs.
2.3 Avoid Overbuying
More isn’t always better. If your system only supports 16GB and you buy 32GB, the extra memory won’t be used. Also, 8GB to 16GB is typically sufficient for everyday users; gamers and creatives may need more.
3. Step-by-Step: How to Upgrade RAM in a Desktop
3.1 Power Down and Unplug
Always shut down your PC and unplug it before opening the case. Hold the power button for 10 seconds to discharge any remaining power.
3.2 Open the Case and Locate RAM Slots
Remove the side panel of your tower (usually with a Phillips screwdriver). RAM slots are located near the CPU, often in pairs. Note the orientation of the notch before installing.
3.3 Install the New RAM
Align the RAM stick with the slot, press down firmly until both side clips snap into place. Don’t force it—it should click smoothly into position. Install in dual-channel pairs if supported for better performance (e.g., use slots 1 & 3, or 2 & 4).
3.4 Boot and Verify
Close the case, power up, and check if your system recognizes the new RAM via Task Manager or BIOS. If not, reseat the sticks or try different slots.
4. Step-by-Step: How to Upgrade RAM in a Laptop
4.1 Shut Down and Remove Battery (If Applicable)
Power off the laptop. If the battery is removable, take it out. Unplug all accessories and hold the power button for 10 seconds.
4.2 Access the Memory Compartment
Flip the laptop and unscrew the back panel. Some models have a dedicated RAM access door, others require removing the full bottom shell. Use a plastic prying tool to avoid damage.
4.3 Replace or Add RAM
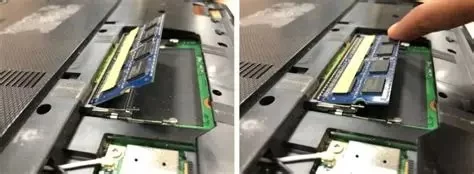
Gently pull the side clips of the existing RAM to pop it out. Insert the new module at a 30-degree angle, then press it down until it clicks into place.
4.4 Reassemble and Test
Reattach the panel, boot up the laptop, and confirm the upgrade under “About This PC” or your system settings. If it doesn’t detect the RAM, repeat the process and check seating.
5. Real Story: My Slow Laptop Now Runs Like New
I had a five-year-old Lenovo ThinkPad that struggled to keep up with Zoom calls and spreadsheets. A local tech friend suggested I upgrade the RAM from 4GB to 12GB. I was skeptical, but followed a DIY video and used a $35 stick of DDR4 RAM. The result? It booted faster, opened apps instantly, and even handled Adobe Photoshop without crashing.
That single upgrade breathed new life into a laptop I almost replaced. Since then, I’ve helped friends and family do the same—it's one of the simplest tech fixes that delivers massive payoff.
6. When to Get Help from Experts
6.1 If You're Nervous About Opening Your Device
It’s okay if DIY isn’t your thing. If you're worried about static damage, warranty issues, or damaging delicate parts, it’s safer to let pros handle it. Some systems (especially ultrabooks or Apple devices) have soldered RAM or tricky configurations that make upgrades difficult.
6.2 Where to Find Reliable Tech Help
That’s where Computer Repair comes in. Whether you need help identifying the right memory or want a trained tech to install it, they’ll make the upgrade process hassle-free. They also inspect your system for bottlenecks, ensuring you get the most out of your new RAM.
Upgrading RAM can feel intimidating at first, but with the right guidance and tools, it's a beginner-friendly DIY that can seriously transform your computer's speed and usability.


