How to Fix Automatic Repair on My Computer
Experiencing a stuck automatic repair loop on your computer can be frustrating. It may occur when your system fails to boot up properly, and Windows automatically attempts to repair itself. While the process is designed to be simple, it often doesn't work as expected, leaving users stuck in an endless cycle of repair attempts. In this article, we’ll explore the common causes of this issue and discuss step-by-step solutions to resolve it.

Action Computers Inc. -- Denver Location
2890 S Colorado Blvd F, Denver, CO 80222, USA
Understanding the Issue
When you encounter the "Preparing Automatic Repair" message, your system is attempting to fix startup problems automatically. However, this process isn't always successful. It might result in a black screen or an inability to reach the desktop. The primary reasons for such failures include corrupted system files, faulty hardware, or issues caused by software updates.
Fix It Computer Repair
2638 Geranium Ln, Fort Collins, CO 80525, USA
Causes of the Automatic Repair Loop
There are several possible causes of the automatic repair loop. Understanding these can help you identify the right approach to fix the problem:
- Corrupted System Files: Corruption in critical system files or boot records is one of the leading causes of the automatic repair failure.
- Hardware Issues: Sometimes, physical issues such as failing hard drives or RAM can cause the repair process to fail.
- Recent Updates or Driver Installations: If a recent Windows update or driver installation went wrong, it could cause conflicts leading to this problem.
- Software Conflicts: Software running on your computer may interfere with the boot process and prevent it from completing successfully.
Step-by-Step Guide to Fix Automatic Repair Loop
Here’s a step-by-step guide to help you fix the automatic repair issue and get your computer back up and running.
1. Perform a Hard Reboot
The first step is to perform a simple hard reboot. Turn off your computer completely, unplug any peripherals, and wait for a few seconds before turning it back on. Sometimes, a quick reset can resolve temporary glitches that prevent the repair process from completing.
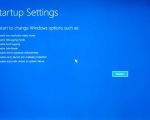
2. Use Safe Mode
If the reboot didn’t work, try booting into Safe Mode. Safe Mode runs Windows with minimal drivers, allowing you to troubleshoot without interference from third-party applications or drivers.
- Restart your computer and press F8 (or another specified key depending on your PC) as soon as it starts to boot.
- Choose Safe Mode with Networking from the boot options.
- If the system boots successfully, you can uninstall recent software or drivers that may have caused the issue.
3. Run Startup Repair
If you can’t access Safe Mode, you can run the Startup Repair tool. To do this, you’ll need a bootable USB or DVD with Windows 10 installed. Follow these steps:
- Insert the bootable media and restart your computer.
- Select your language preferences and click Next.
- Click Repair your computer > Troubleshoot > Advanced Options > Startup Repair.
- Let the tool run and follow any on-screen instructions.
4. Use System Restore
If the Startup Repair didn’t work, try using System Restore. This tool can revert your computer back to a previous point before the issue occurred.
- Boot from the installation media again.
- Navigate to Repair your computer > Troubleshoot > Advanced Options > System Restore.
- Select a restore point from when the computer was working fine and follow the prompts.
5. Perform a System File Check (SFC)
Corrupted system files can cause many boot issues, and running the SFC tool can help resolve these problems. If you're able to access Safe Mode or boot into the recovery environment, follow these steps:
- Open Command Prompt as an administrator.
- Type sfc /scannow and press Enter.
- Wait for the process to finish and fix any detected issues.
6. Reset or Reinstall Windows
If none of the above methods worked, your last resort is to reset or reinstall Windows. This will remove all apps and settings, but you can choose to keep your files:
- From the Advanced Startup Options, select Reset this PC.
- Follow the on-screen instructions to either keep your files or remove everything.
Conclusion
Dealing with an automatic repair loop can be a stressful experience, but following these steps should help resolve the issue. From performing a hard reboot to running system tools like Startup Repair and System Restore, you have several methods to fix the problem. If these solutions don't work, consider seeking professional help to ensure that your hardware and system are functioning properly.
Remember, if you're uncomfortable performing any of these steps yourself, or if the issue persists, don't hesitate to reach out to a professional technician. They can help restore your computer to its full functionality, ensuring you don’t lose any important data along the way.