Why Does My Computer Say Automatic Repair?
If you’ve ever encountered the dreaded “Automatic Repair” message on your computer screen, you know how frustrating and confusing it can be. I remember the first time my PC booted up to this message, leaving me staring at the screen, wondering what went wrong. Was it a simple glitch, or was something more serious at play? Over time, I’ve learned a lot about what causes this issue and how to resolve it. Let’s dive into why your computer might say "Automatic Repair" and how to troubleshoot the problem effectively.

Action Computers Inc. -- Denver Location
2890 S Colorado Blvd F, Denver, CO 80222, USA
1. What is the "Automatic Repair" Message?
When your computer displays an "Automatic Repair" message, it usually means that Windows has encountered a problem during the startup process and is trying to fix it automatically. The system detects an error, often related to boot files or system settings, and attempts to resolve it through the built-in repair tools. While this sounds like a helpful feature, it often leads to a frustrating loop where the repair process itself fails to complete, leaving you stuck in a never-ending cycle.
Fix It Computer Repair
2638 Geranium Ln, Fort Collins, CO 80525, USA
1.1 Causes of Automatic Repair
Several factors can cause the "Automatic Repair" message to appear. The most common causes I’ve encountered include:
- Corrupted system files or boot files
- Issues with Windows updates or upgrades
- Hard drive or SSD failures
- Corrupted or missing system drivers
- Incorrect BIOS settings
Understanding the root cause can help you decide on the best approach to fix it. In many cases, a simple system restore or running a few command-line operations can resolve the issue, but more complex cases might require hardware checks or reinstalling Windows entirely.
2. How to Fix the "Automatic Repair" Loop
Once you’ve determined that your computer is stuck in an automatic repair loop, it’s time to troubleshoot and attempt a solution. Here are some of the methods that have worked for me:
2.1 Perform a Hard Reboot
The first thing I try when facing the "Automatic Repair" error is a hard reboot. Simply turning off the computer and restarting it may allow Windows to bypass the error and start normally. To perform a hard reboot, press and hold the power button until the computer turns off. Wait a few moments, then turn it back on. While this doesn’t always work, it’s worth trying before diving into more complex fixes.
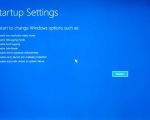
2.2 Use the Startup Repair Tool
If a hard reboot doesn’t work, the next step is to use the built-in startup repair tool. To do this:
- Boot your computer into the Windows Recovery Environment (WinRE). You can access this by turning your computer on and off three times in a row to trigger WinRE.
- In WinRE, select "Troubleshoot" > "Advanced options" > "Startup Repair."
- Allow the tool to scan and attempt to fix any issues with your system's startup process.
In most cases, the startup repair tool will identify and fix issues related to corrupted boot files. However, it might not be able to resolve more serious underlying problems like hardware failure.
2.3 Run Command Prompt Commands
If the startup repair tool doesn’t solve the issue, you can try running a few commands in the Command Prompt. This is where I found success when dealing with corruption in system files. Here’s how to do it:
- Boot into the Windows Recovery Environment (WinRE) again.
- Select "Troubleshoot" > "Advanced options" > "Command Prompt."
- In Command Prompt, type the following commands one by one and press Enter after each one:
- bootrec /fixmbr
- bootrec /fixboot
- bootrec /rebuildbcd
- After completing the commands, restart your computer to see if the issue is resolved.
These commands can help repair issues related to the Master Boot Record (MBR), boot sector, and boot configuration data (BCD) that are essential for booting your system.
3. What if the Issue Persists?
If none of the above solutions work, the problem might be deeper than just software corruption. Here are a few additional steps to consider:
3.1 Check Your Hard Drive or SSD
One of the most common causes of automatic repair failure is a faulty hard drive or SSD. If you suspect that your storage device is the issue, you can use diagnostic tools to check for errors. Some tools, such as CHKDSK, can scan for bad sectors and fix minor errors on your drive.
To use CHKDSK, you can enter it in the Command Prompt under WinRE by typing:
chkdsk C: /f
This command will scan and attempt to fix any issues with the C: drive. If CHKDSK finds serious problems with the drive, you may need to replace it to get your system back in working order.
3.2 Restore Your System to an Earlier Point
If you’ve recently installed an update or software that could have caused the problem, a system restore to an earlier point might fix the issue. To do this, follow these steps:
- In WinRE, select "Troubleshoot" > "Advanced options" > "System Restore."
- Choose a restore point before the issue occurred and allow Windows to restore your system settings.
This can resolve problems caused by recent updates or changes to system files.
3.3 Reinstall Windows
If all else fails, reinstalling Windows might be the only option left. While this will result in the loss of your programs and data, it can provide a fresh start for your system. You can reinstall Windows by creating a bootable USB drive or using recovery media provided by your PC manufacturer.
4. Preventing Future Automatic Repair Issues
Once you’ve fixed the issue, it’s important to take steps to prevent the "Automatic Repair" problem from happening again. Here are a few preventive measures that I’ve found useful:
- Regularly update your system to ensure it has the latest patches and security fixes.
- Back up your files regularly so that if something goes wrong, you won’t lose important data.
- Consider using a solid-state drive (SSD) instead of a traditional hard drive for faster performance and greater reliability.
- Run regular disk scans to check for potential issues with your system’s storage.